How To Use Basic MarvinSketch Functions
Table Of Contents
Create New Molecule
A new, blank molecule is created when you first launch MarvinSketch. You
can immediately begin working with this molecule. A MarvinSketch window can
hold only one molecule at a time, so all work you do within the
canvas is considered part of the same molecule. You can create a new,
blank molecule at any time during your session by choosing
File > New > Clear Desk from the menu bar. This
will clear the desk and discard any unsaved changes to the molecule you were
previously working with (but you can get it back using the Undo option).
The application allows you to work with
multiple molecules in multiple windows by choosing File
> New > New Window .
Open an Existing
Molecule File
You can open existing molecule files
(from supported file formats) by
choosing File > Open on the menu bar.
It will load the content of the molecule file into Marvin and discard any
unsaved changes.
You can also Paste existing structures from other windows to
the open molecule, as well as Drag&Drop a molecule file into the Marvin
window. Both actions will add the new structure to the currently open
molecule without overwriting the content of the canvas.
Save Molecule
Save Molecule File
You can save the molecule to any of the supported
file formats.
This will allow you to open and work with this molecule later. The
default behavior of the Save
button is to save the molecule to the same file it was opened from,
in the same format. If you want to change the file name or format,
choose Save As.
If you are working with a new molecule, Save
will function the same as Save As.
Save As Image
The Save As Image choice
in the File menu allows you to save an image of the
molecule in the sketcher. Marvin supports the following image
formats: JPEG, PNG, PPM, POVRay, and SVG. Please note that the saved image
cannot be edited in Marvin.
Print
You can print an image of the current molecule by choosing
File > Print. If you print from a single page
document, if the size of your molecule(s) is bigger then the paper size, it will
be shrinked to one page.
If you want to print your molecule(s) to multiple
pages, you have to change the document type to Multipage Document in
File > Document Settings..., and arrange the
structures on the pages.
How to Work with Multipage Molecular Document
How to create a multipage molecular document
Multipage molecular documents help to work with large drawings by dividing them into pages.
You can create a multipage molecular document by choosing
File > Document Settings..., then checking in the
Multipage document checkbox.
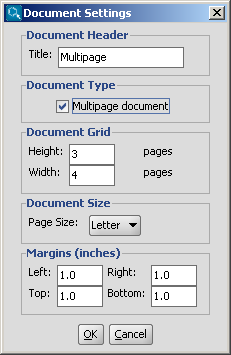
You can set the number of horizontal and vertical pages in the
Document Grid part, and you can also define the title,
the page size and the margins in the corresponding sections of this dialog window.
After pushing the OK button, the following controls become automatically available:
- The items in the View > Pages menu are enabled
- A navigation statusbar appears on the bottom of the window
- The frame of the pages appear on the canvas, while the title, the margins and
the page numbers are displayed on each page
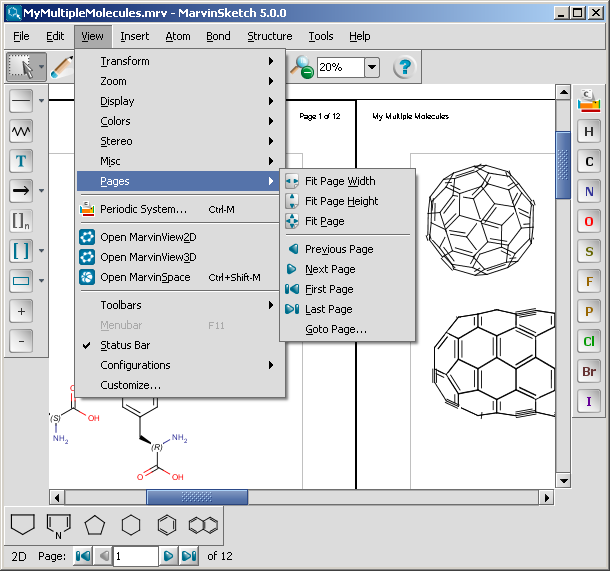
How to navigate in multipage molecular documents
The navigation statusbar and the items in the View > Pages menu are
available only if the Multipage document checkbox is set.
The statusbar contains information about
the current page number in a textfield and the number of all pages on a label.
It also contains a collection of buttons to
aid your quick navigation in the document. You can go the the first, previous, next, and last page
using them. Alternatively, you can go directly to a specific page
by entering a number in the current page field and pressing enter.
All the navigation possibilities: go to first, previous, next, last, specific
pages are available from the View > Pages menu as
well. In addition, some automatic page zooming functions are also available in this menu, such as:
- View > Pages > Fit page height adjusts the
height of the current page to the height of the canvas.
- View > Pages > Fit page width adjusts the
width of the current page to the width of the canvas.
- View > Pages > Fit page adjusts the height
and/or the width of the current page to see the whole page, and places it
centralized within the canvas.
How to Draw Structures
You can create structures using atoms, bonds, and templates.
Atoms
Select an atom from the Atoms Toolbar,
the Periodic Table dialog, or by
shortcut.
Move the mouse into the molecule
canvas. You will see the symbol of the selected item at the tip of
your cursor. It can be placed in the molecule by left-clicking on
the desired location.
You can replace any atom in the molecule by placing a new
atom on top of it.
Bonds
Select a bond type using the
Bond toolbar button or by
shortcut.
To link two existing atoms, click
on one then drag the cursor to the other.
To draw a bond from a single atom,
simply click the atom. A carbon atom will be added at the other end
of the bond.
If you add a bond to empty canvas
space, a carbon atom will be added to each end of the bond.
You can replace any bond in the
molecule by placing a new bond type on top of it.
Bond types can also be changed using the
Bond pop-up menu. Single
bonds can be changed to Double or Triple by
left-clicking on them.
Templates
MarvinSketch provides several predefined chemical structures,
called templates (e.g., cyclopenthane, cyclohexan, benzene).
The templates can be accessed via the Advanced Templates Toolbar
or through the Insert > Template Library menu.
Select a template using the
Template Library or the Advanced Templates Toolbar area.
Place the template structure by left-clicking on the
desired location.
Coordination compounds
You can use coordinate bond to represent coordination compounds (ferrocenes, metallocenes).
For example:
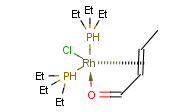
The coordinate bond type can represent the connection between an atom and a group of atoms.
The coordinate bond has two kinds of appearance according to IUPAC recommendation:
- arrow between two atoms,
- dashed line between an atom and a group of atoms
.
To draw a bond between two atoms just choose the coordinate bond from
the bond list and draw the bond by specifying the required direction. To draw a
bond between an atom and a group of atoms you need to create
a multi-center attachment point to represent the group of atoms.
To draw a coordinate bond between an atom and a group of atoms.
- Select the atoms to be represented at one end of the coordinate bond by a multi-center.
- Choose "Structure/Add/Multi-center" from the main menu or
"Add/Multi-center" from the contextual menu. A multi-center represented by a "*" will
be added. If you move the cursor to the multi-center the represented atoms are
highlighted (blue circle around the atom labels).
- Draw a coordinate bond from the multi-center and edit the other end of the bond if required.
The "*" representing the multi-center disappears after bond drawing.
- Repeat steps 2-4 to draw further multi-centers and coordinate bonds if required.
Markush structures
A Markush structure is a description of compound classes by generic notations.
They are often used for patent claims and for combinatorial libraries.
Link R-groups, link nodes, atom lists, position variation and
repeating units with repetition ranges are commonly used features in the representation of markush structures.
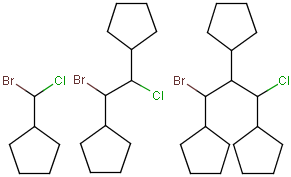
Position variation (Variable point of attachment)
You can create a variable point of attachment to represent a variable connection point to a group of atoms.
The representation is similar to the above mentioned multi-center bonds.
For example:
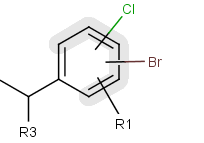
The alternative attachment points are displayed with grey shadow.
If you move the cursor to the center (the bond ending in the ring) the represented atoms are
highlighted (blue circle around the atom labels).
To draw a position variation
- Draw the structure that will include the position variation.
- Select the alternative connecetion point atoms.
- Choose "Structure/Add/Multi-center" from the main menu or
"Add/Multi-center" from the contextual menu. A multi-center represented by a "*" will
be added. If you move the cursor to the multi-center the represented atoms are
highlighted (blue circle around the atom labels).
- Draw a bond from the center and edit the bond if required. The represented atoms
are displayed with grey shadow after this step. The "*" representing the multi-center
disappears after bond drawing.
- Repeat step 2-4 to draw further variable points if required.
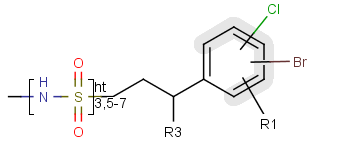
Frequency variation (repeating unit with repetition ranges)
A sequence of ranges to specify the repetition can also be used in a special
group called repeating unit with repetition ranges. For example:
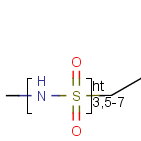
Here the repetition range is "3,5-7". The repetition count for the included structure
(enclosed by the brackets) can be: 3,5,6 or 7.
See Repeating units with repetition ranges
for further information on drawing this feature.
Reactions
How to Draw Reactions
You can place a reaction arrow on the canvas at any time, even on
a blank canvas. Reaction errors are indicated by a red box around the
reaction arrow. Only one reaction is allowed per molecule.
Select the
React
button. You will see the reaction arrow on the tip of the cursor when
you move the mouse into the canvas area.
Click the location of the tail of
the arrow.
Drag the mouse and release at the location of the head.
Once you have placed a reaction arrow
on the canvas, MarvinSketch considers each part of the molecule in
relation to the reaction.
All parts of the molecule that are behind the arrow are considered reactants.
Everything in front of the arrow is a product. Anything placed along the
arrow is considered an agent.
The validity of the drawn reaction will automatically be checked by Marvin.
See Reactions for more information on
using and disabling this feature.
How to Map Reactions
The arrow tool provides the easiest manual way to map corresponding reactant
and product atoms. Select the arrow tool, hold down the left mouse button on a
reactant atom, and drag it to the corresponding product atom. The same map
number is added to both atoms marking, that they represent the same atom on the
two sides of the reaction scheme. There are also keyboard shortcuts for
mapping. Type m8, for example, and click on an atom. Atom map 8 is assigned to
that atom.
Marvin contains an automapper tool as well (available from the
Edit/Atom Mapping/Auto Map menu) assigning map numbers to all selected atoms of
a reaction automatically.
Map numbers of the selected atoms can be removed by the
Edit/Atom Mapping/Clear Map menu item, or by typing m0 for the selected
atoms.
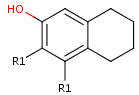
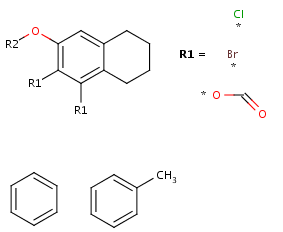
How to Draw R-group queries
An R-group query describes a set of derivatives in one query structure (substitution
variation). It can be drawn the following way: First
draw the root structure and place some R atoms either from the "More" dialog,
from the popup menu or by typing a corresponding label such as "R1" on the
keyboard.
Then draw the variable R-group ligands and select those substituting the R1 atom.
If you type "R1" now, the selected groups will be marked with "R1". Additional
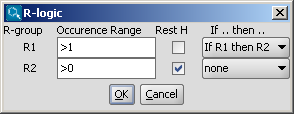
R-group conditions (Occurrence, RestH, If-then) can be set in the R-logic dialog
available from the Edit/Attributes menu.
To draw the attachment points for the R-definitions, you can use menu
"Group -> Attachment point" from the atom popup menu, or alternatively,
when you draw the R-definitions and the mouse cursor still shows "R1",
clicking on an atom of the definition will toggle the attachment point on that
atom. (Please note that divalent R-groups must have two attachment points
defined.)
Step by step example
- Draw the root structure first.
- Move the cursor to the atom where you would like to place the R-group.
(In this example, we place R-groups in place of the terminal carbon atoms.)
When the atom is highlighted (blue circle around the atom label), type the
shortcut of the required R-group ID (e.g. R1). Alternative solution is
selecting the ID from R-group sub-menu of the popup menu by pressing right
mouse button over the atom.
- Draw an alternative ligand with an R-group connection: Move the cursor to an empty place on the canvas (take care that nothing is selected) then press
the shortcut of the next R-group (R2). The "in hand" object changes to the ID of the R-group (R2). (In this example, we add a ligand to terminal oxygen atom.)
Move the cursor over the atom (the terminal oxygen) where you would like to add the new ligand and push the left mouse button. Then drag the mouse. You will
see that the new bond is displayed and its orientation follows the cursor.
Release the mouse button when the bond stands in the right direction.
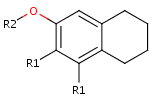
- Draw new fragments to the canvas (separately from the root structure), which
will be the R-group definitions. (In this example, we draw the fragments for
the first R-group definition to the right side and the second R-group
definition will be placed below the root structure.)

- Next, define the R-groups definitions. To do this, select those fragments
that the first R-group should contain (on the right side).
After the selection, press the shortcut of the R-group ID (R1). The ID and equal sign (R1=) will display beside the selected set and the "in hand" object
will be the R-group ID.
- Define attachment point to R-group members: Click the left mouse button on
atoms where you would like place the attachment points.
Repeat this operation on the other definitions of the R-group.
(In this example, at the third definition, we select the left oxygen atom
for attachment.) Alternatively, you can define R-group attachment points
via the popup menu (by selecting Attachment point option from the Group
menu on an atom of an R-group definition.
- Create the second R-group by repeating the last two steps on the two
remaining fragments.
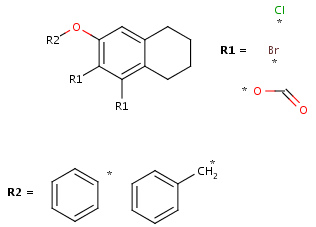
- You can define additional conditions, such as occurrence, rest H and if-then
expressions to R-groups in the R-logic dialog. To do this,
select menu option Edit -> Attributes -> R-logic.
After setting the conditions in the R-logic dialog, press the
OK button to apply the changes.
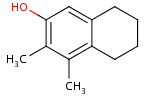
How to Draw S-groups
Abbreviated (superatom) S-groups
Abbreviated S-groups are used to represent a part of a structure with a text abbreviation.
For example:
To create an abbreviated S-group first select the structure to abbreviate then open the "Create Group..." dialog (Group/Create Group... submenu).
You can retrieve the hidden structure from the text abbreviation with the "Expand"
function and hide the structure with the "Contract" function.
Manipulation with abbreviated S-groups is possible with "Expand", "Contract",
"Ungroup", "Remove" from the Group submenu.
Syntax of the abbreviated S-group name
Numbers are automatically subscripted unless "\n" is used or at the start of string.
Charges (+, -, ++, --, 3+ etc.) are automatically superscripted at end of string
or if the following character is a closing paranthesis.
Allowed control sequences in the abbreviated S-group name:
- \s - subscript
- \S - superscript
- \n - normal mode.
Example: \S13CH4
Multiple S-groups
Multiple S-groups are used to represent a repeating part in a structure with a shorter
form. To create a multiple S-group first select the structure to multiply then open the "Create Group..." dialog (Group/Create Group... submenu).
Here you can specify a positive repeating count depending on how many times you want the structure to be repeated.
You can retrieve the whole structure from the condensed form with the "Expand"
function and shorten the structure with the "Contract" function.
Manipulation with multiple S-groups is possible with "Expand", "Contract",
"Ungroup", "Remove" from the Group submenu.
For example:
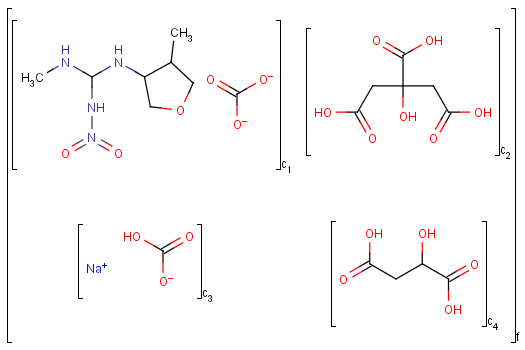
Components, Unordered Mixtures and Ordered Mixtures
These features can be expressed by brackets (S-groups) of type component,
unordered mixture (also called mixture)
and ordered mixture (also called formulation).
A component here is a set of atoms contained by a component bracket.
Ordered and unordered mixtures
An unordered mixture (denoted by "mix" at the bottom of the right bracket)
consists of several unordered components (denoted by "c" at the bottom of the right bracket).
For these types of mixtures, the order of addition during the
preparation is not important. Example:
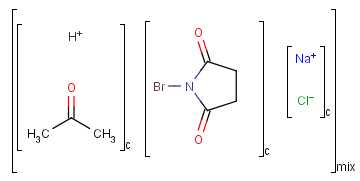
Ordered mixtures, on the other hand contain ordered
components, which define the order of addition. Example:
To draw an unordered component
- Draw the structures that form the mixture.
- To define a structure as a component in a mixture, first select the structure.
- Choose "Create Group..." from the contextual menu (right mouse click on the selected structure).
- In the "Create Group" dialog choose "Component (c)" from the "Type" combobox.
- The "Order" field should be empty or should contain "none".
If the "Order" field already contains a number, just
delete it (you can type in "none" as well).
- Click OK.
To draw an ordered component
- Draw the structures that form the mixture.
- To define a structure as a component in a mixture, first select the structure.
- Choose "Create Group..." from the contextual menu (right mouse click on the selected structure).
- In the "Create Group" dialog choose "Component (c)" from the "Type" combobox.
- If this is the first component of the mixture,
click the "Order" field and enter "1" in place of "none".
If the "Order" field already contains a number Marvin will automatically increment the
"Order" field for subsequent components.
- Click OK.
To draw a mixture
- Create and select the components to form the mixture.
- Choose "Create Group..." from the contextual menu
(right mouse click on the selected components).
- In the "Create Group" dialog choose the type
("Ordered mixture(f)" or "Unordered mixture(for)") from the "Type" combobox.
- Click OK.
To change the type of a mixture
- Select the mixture to change the type.
- Choose "Ungroup" from the contextual menu
(right mouse click on the selected mixture).
- Change the type of the included components.
- Select the components to create the new mixture.
- Create the new mixture from the selected components.
To add a new component to a mixture
- Select the mixture to add the new component.
- Choose "Ungroup" from the contextual menu
(right mouse click on the selected mixture).
- Create the new component to add.
- Select the new and old components and create a mixture again.
To delete a component from a mixture
- Select the mixture to delete the component from.
- Choose "Ungroup" from the contextual menu
(right mouse click on the selected mixture).
- Delete the component.
- Select the remaining components and create a mixture again.
Polymers
The polymer structure consists of structural fragments. These fragments are enclosed by polymer
brackets. The meaning of a polymer bracket is that the fragment within the brackets can
repeat with itself. The fragment within the bracket is called repeating unit.
Polymers can be represented as structure-based or source-based polymers depending on how
much structural details are known.
Source-based representation of polymers.
You can use the monomer (mon) or mer (mer) repeting unit types to draw a polymer where only the
source-based representation is known. For example:
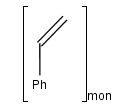
To draw a repeating unit select the atoms you want to be included and choose Create Group from Structure menu
or Group/Create Group from contextual menu.
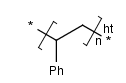
Structure-based representation of polymers.
You can use the structural repeating unit type (SRU) to draw a polymer where the structure-based
representation is known.
Each SRU S-group has two or more dedicated bonds, called
crossing bonds, that cross the brackets. The crossing bonds of an SRU show
how the repeating units may connect in several ways to each other within the polymer.
Depending on the number of crossing
bonds and brackets we differentiate the following polymers and connectivities within the polymer:
- Polymers with two crossing bonds.
If the polymer has one crossing bond on each bracket of the SRU
there are three possibilites for the repeating pattern:
- head-to-tail
- head-to-head
- either/unknown
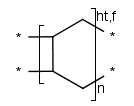
- Ladder-Type Polymers
Polymers with paired brackets and with two crossing bonds on each bracket are
called ladder-type polymers. Here it must be specified how the two crossing bonds
on each bracket connect to the corresponding bonds of the adjoining repeating units.
Additionally to the head-to-tail, head-to-head connectivity information
there is a flip information to specify whether the repeating unit flips around the polymer
backbone when it connects to the adjoining SRU.
These informations are handled only in case of brackets
with exactly two crossing bonds on both side (head and tail side).
We differentiate the following polymer connectivities:
- head-to-tail with no flip
- head-to-tail with flip
- head-to-head with no flip
- head-to-head with flip
- either/unknown
- Polymers with three or more brackets.
If the polymer has three or more bonds with a separated bracket on each bond,
the polymer always has the either/unknown repeating pattern.
The end groups of polymers are often unknown or unspecified which are represented by star atoms (*).
The modified (mod), grafted (grf) and crossliked (xl) form of a structural repeating unit can be drawn as well.
Copolymers
If the structure consists of more than one repeating unit (mon, mer) or structural repeating unit,
Copolymer (co) brackets/groups can be used to represent the structure. Copolymers might contain crossing bonds and
star atoms.
The following copolymers can be drawn:
- random(ran)
- alternating(alt)
- block with or without junction unit (blk)
- copolymer to represent modified polymers (mod)
- copolymer to represent grafted polymers (grf)
- copolymer to represent cross-linked polymers (xl)
For example:

To draw a simple polymer
- Draw the structure that forms the polymer.
- To define a structure as a polymer, first select the structure. Leave out the atoms that should be replaced by "*" (star atoms).
- Choose "Groups/Create Group..." from the contextual menu (right mouse click on the selected structure).
- In the "Create Group" dialog choose the appropriate type from the "Type" combobox.
- Set the polymer repeat pattern if neccessary.
- Click OK. The star atoms ("*") will be added automatically.
To draw a ladder-type polymer
- Draw the structure that forms the polymer.
- To define a structure as a polymer, first select the structure. Leave out the atoms that should be replaced by "*" (star atoms).
- Choose "Groups/Create Group..." from the contextual menu (right mouse click on the selected structure).
- In the "Create Group" dialog choose the "SRU polymer" type from the "Type" combobox.
- Set the polymer repeat pattern if neccessary.
- Click OK. The star atoms ("*") will be added automatically.
- To create a bracket that crosses two bonds select the two bonds (they should be already crossed by a single bracket each) and choose
"Groups/Merge Brackets" from the contextual menu.
To draw a copolymer
- Create and select the components to form the copolymer.
- Choose "Groups/Create Group..." from the contextual menu
(right mouse click on the selected components).
- In the "Groups/Create Group" dialog choose the type
("Copolymer (co)", "Copolymer, alternating (alt)", "Copolymer, block (blk)" or "Copolymer, statistical (stat)") from the "Type" combobox.
- Click OK.
To change the type of a polymer
- Select the polymer to change the type.
- Choose "Ungroup" from the contextual menu
(right mouse click on the selected polymer).
- Create the new polymer from the selected structure(s).
To add a new subpolymer to a copolymer
- Select the copolymer to add the new subpolymer.
- Choose "Ungroup" from the contextual menu
(right mouse click on the selected copolymer).
- Create the new subgroup to add.
- Select the new and old subpolymers and create a copolymer.
To delete a subgroup from a copolymer
- Select the copolymer to delete the subpolymer from.
- Choose "Ungroup" from the contextual menu
(right mouse click on the selected copolymer).
- Delete the subpolymer.
- Select the remaining subpolymers and create a polymer again.
Repeating units with repetition ranges
A sequence of ranges to specify the repetition can also be used in a special group called repeating unit with repetition ranges. For example:
Here the repetition range is "3,5-7". The repetition count for the included structure can be: 3,5,6 or 7.
Syntax of the repetition ranges
The repetition ranges consist of ranges separared by commas. A range can be either a simple non-negativ number (e.g. 3)
or two non-negative number separated by "-" (e.g. 5-7).
To draw a repeating unit with repetition ranges
- Draw the structure that forms or contains the repeating unit.
- To define a part of the structure as a repeating unit, first select the part of the structure expected to repeat.
- Choose "Groups/Create Group..." from the contextual menu (right mouse click on the selected part).
- In the "Create Group" dialog choose the type "Repeating unit with repetition ranges" from the "Type" combobox.
- Set the repetition ranges.
- Click OK.
How to Draw Graphic Objects
and Text Boxes
To draw a (poly)line, rectangle or text box, use the
Insert menu. Point the mouse to the
desired position on the canvas, click and hold the left button, move the mouse
and release the button. After placing a text box,
you can immediatelly use the keyboard to type a text.
To change the contents of a text box, choose
Select mode, click on the box, then use the
keyboard.
The shape of an object is changeable or resizeable by dragging one of its points to do it.
To insert the IUPAC Name text box choose it from the Insert
menu, it will be automatically inserted under the structure. The name will be updated
real-time.
How to Draw a Link atom
You can draw link atoms using the popup menu in two ways:
- Right-click on the atom to bring up the popup menu. Select the required
repetition number from the "Link node" submenu. Marvin will find out the
outer (non-repeating) bonds for you.
- Select the atom you would like to be the link node and two neighbouring
bonds for outer (non-repeating) bonds. Right-click anywhere on the canvas
to bring up the popup menu. Select the required repetition number from the
"Link node" submenu.
Marvin will advise you if it is not possible to create a link node for the
specified configuration (for example at ring fusions).
Outer (non-repeating) bonds will be denoted by brackets crossing them, and
the repetition numbers will be put on the atom. All portion of the molecule
connected to the link atom through non-outer bonds are supposed to repeat
together with the atom. See examples below.
| Molecule with link node |
Meaning |
 |
 |
 |
 |
 |
 |
To edit a link node repetition number or change outer bonds, repeat the
drawing steps above. To make a link atom ordinary atom again, select "Off" from
the "Link node" submenu.
How to Select a Structure
Set Selection mode on by clicking
the Select button.
To select a single atom, click
on it.
To select two joined atoms,
click on the bond that links them.
To select a rectangular region,
click at one corner of the desired region and drag the mouse
to the opposite corner. While the mouse button is pressed
down, a guide will be displayed to aid you.
To select a non-rectangular
region, use the lasso select function.
Click anywhere on the
canvas and release the mouse button.
Draw the region with
your mouse (leaving all mouse buttons unpressed). A blue
guide line will appear where you have drawn. A pink line
will connect the start and end points.
When you have finished drawing the region, click the
mouse. In the event that you have not closed the region,
the pink line will be used to close it for you.
You can unselect all by clicking an empty area of the canvas.
How to Delete a Structure
Using the Erase
button:
Set Erase mode on by clicking the
Erase button.
To erase a single atom or bond,
click on it.
To erase a rectangular region,
click at one corner of the desired region and drag the mouse
to the opposite corner. While the mouse button is pressed down,
a guide will be displayed to aid you.
To select a non-rectangular
region, use the lasso erase function.
Click anywhere on the
canvas and release the mouse button.
Draw the region with
your mouse (leaving all mouse buttons unpressed). A blue
guide line will appear where you have drawn. A pink line
will connect the start and end points.
When you have finished drawing the region, click
the mouse. In the event that you have not closed the
region, the pink line will be used to close it for you.
Using Selection mode:
Select a portion of the structure.
Click the Cut button or use the DELETE
button on your keyboard.
Using pop-up menus:
Right click on an atom or bond.
Select Remove from the pop-up menu.
How to Work with Structures
Visually Editing the Structure
You can edit a molecule using the methods described in
How To Draw Structures and
How To Delete A Structure.
Editing the Source
You can alter a molecule by directly editing its source in the
Edit Source Window. You can view and edit the source in any of the
supported file formats. To change format, simply select the desired
one from the View
Menu. To reload the molecule described by the text in this window
into the MarvinSketch canvas (including any changes you may have
made), select File >
Import. This will close the Edit Source Window.
Cleaning
Marvin allows you to clean your molecule in either 2D or 3D. Cleaning
will calculate new coordinates for the atoms. Generating conformers and
choosing the favored one is also supported (in the Swing version).
You can initiate cleaning via the Edit
> Clean submenu. For more information on molecule cleaning, please visit
this link.
Aromatic Rings
You can toggle the display of rings as aromatic using the
Edit > Bonds submenu.
Structure Display Options
There is a wide range of functions related to the display of the
molecules. These settings can be found in the
View menu and
the Preferences dialog.
Additionally, you can move, rotate, and zoom in/out on the structure.
Moving and Rotating
You can move or rotate a selected structure.
Select the part of the structure
you wish to move.
Moving the selection:
Move the mouse pointer toward
the center of the selected structure until a blue
rectangle appears.
Translate the selection by
dragging the mouse.
Rotating the selection:
Move the mouse pointer toward
the "edge" until a blue gear appears.
Rotate the selection by dragging the mouse.
Scaling
You can set the magnification of the molecule being on the canvas by the
Zoom buttons.
When a molecule is loaded into the sketcher it is scaled
automatically to fit the window.
Molecule Format
You can set the display format for the molecule and screen
resolution using the View
> Display submenu. Available molecule formats are
Wireframe, Wireframe
with Knobs, Sticks, Ball and Stick, and Spacefill.
You can set the resolution to low or high via the Quality
submenu.
Colors
The View >Colors
submenu allows you to specify the color
scheme of the molecules. The available options are:
Implicit/Explicit Hydrogens
Marvin has a number of options for the display of implicit and
explicit hydrogens. Because Marvin is chemically intelligent, it will
automatically add hydrogens as necessary within the structure.
Generally, these will be implicit and displayed based on the options
set in the View
menu.
To view all hydrogens explicitly, displayed as atoms with bonds to
neighbors, chose Edit
> H-Atoms > Add. The Edit
> H-Atoms > Remove will return to the previous display mode.
To view implicit hydrogens by symbol, use the View
> Hydrogens > Implicit menu group. This option
is disabled in Spacefill and Ball & Stick display modes.
Error Highlighting
Marvin can not automatically correct all valence errors or any reaction errors. Instead,
these errors are highlighted and you may make the
appropriate corrections yourself.
This option can be enabled and disabled through the the Edit
> Preferences box.
Saving Display Options
Many of the display settings in Marvin are saved and reloaded the next time you start the program.
Background color, molecule color scheme, and hydrogen visibility can be set
from the View menu and will saved automatically when you exit the program.
Other options, including look & feel, error highlighting, and object visibility
can be set using the Preferences dialog from
the Edit menu.
Launching Other Windows
2D and 3D Viewer Windows
Choosing View >Open 2D Viewer or
Open 3D Viewer
launches a MarvinView window containing the current molecule from the Sketcher.
Sketcher Window
When working with applets within a web page, it may be helpful to view your
work in a MarvinSketch window outside of the html.
To open your work in a separate Sketch window from
applets, choose View > Sketcher Window.
How to customize structure drawing styles
To load or define styles use the Edit > Format... menu.
This menu brings up the "Format of the current document" dialog in which atom
and bond format options can be specified. These include atom font type, size, color and bond thickness, color.
All these options can be collectively set using styles.
The top three radio buttons specify the target of the format settings being edited in the dialog.
The "Apply changes for all the atoms/bonds" option allows to load predefined styles or to create your own style using
the Load Style and Save Style buttons.
Loading a style
After pressing the Load Style button, you can load a style from a combo box or browse amongst the previously defined
style files. The chosen style will be loaded into the "Structure Drawing Properties" in the "Format of the current document" dialog.
Saving a style
Set the "Structure Drawing Properties" you wish to save and press the
Save Style button to get to the "Save" dialog where you can enter the name of the style file and save the style.
All your own saved files will be stored under the <HOMEDIR>/chemaxon/styles/ directory (where <HOMEDIR> is the user's home
directory) and will be added to the combobox items.
A new style file can be added to the chemaxon/marvin/styles directory under the Marvin installation directory.
This new style file has to be listed in file chemaxon/marvin/styles/styleFileList.properties. The new style file
will be copied to the <HOMEDIR>/chemaxon/styles/ directory and appear in the combobox of the "Loading of a journal style" dialog.
(No existing style files under <HOMEDIR>/chemaxon/styles/ are overwritten)
Return to Top
Copyright © 1998-2008
ChemAxon Ltd.
http://www.chemaxon.com/marvin