|
|
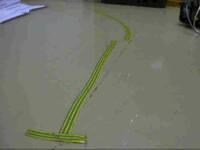
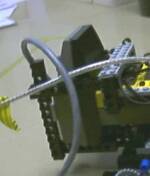
| The robot in action, following a line :) |
Author: Asmo Soinio, asmo@kortis.to, 8.8.2002 (contact information updated 14.10.2005)
My project was to create a robot that could be controlled from Matlab and that has a camera. An additional need was that the robot could be controlled from a PC running Windows 2000. This documentation is written for anyone whom is interested in doing something similar. The programs I wrote can be downloaded from the download page.
The Lego Mindstorms Robotic Invention System seemed to be an affordable way to create the robot. I didn't find any interface to communicate with the Mindstorms robot from Matlab, so I used a Java-Lego-Network-Protocol -interface that I edited to suit my needs. Java objects can be directly used from Matlab. The robot itself uses legOS (nowadays known as brickOS) as it's operating system. The camera is the one that comes with the Lego Vision Command-kit.
I had troubles with the PC-software provided by Lego, as it isn't compatible with Windows 2000. That didn't cause any problems, though, because none of the PC-software by Lego company is used.
Update 25.07.2003: My legOS program fails atleast with brickos-0.2.6.10, so please use legOS 0.2.4, which is the one I used
LEGO® is a trademark of the LEGO Group of companies which does not sponsor, authorize or endorse this site
I have documented the project by dividing it to a number of different parts. Here are the different parts of the project as a table. Each part uses (or controls) the part above it in the table. The parts documented here (more or less) are in bold text.
| The Lego-robot | |
| Lego-robot's operating system (legOS) | Camera on the robot |
| legOS program | |
| IR-receiver and the IR-tower | VFM, a free tool for image grabbing in Matlab |
| The java-interface to communicate with legOS (using LNP) | |
| Matlab programs | |
| Matlab | |

|
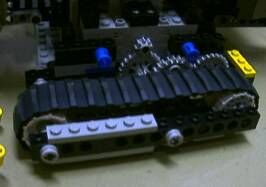
| Picture of the robot |
My first intention was to just build a robot and design as I built it. When I got the RIS i realized that it wasn't going to be such a trivial task, so I just built on of the basic models from the Legos Constructopedia book, the one called Roverbot. Testing the robot i realized that it would run most smoothly with tracks. I also added the bumper to the robot to detect collisions, but it isn't really used by the Matlab-programs.
 |
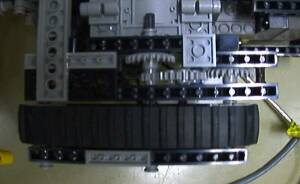 |
| The modified tracks | The modified tracks seen from below |
 |
 |
 |
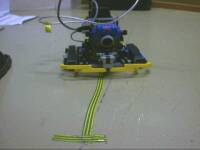
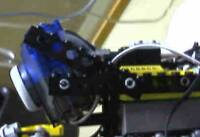
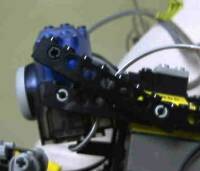
| Camera in line-following-position | Camera in the other position | Vision field of the robot, object detection |
|
| The IR-tower attached to rear the robot |
The interface is based on JavaLNP. It can be used without Matlab by simply sunning the main class with
java robot3.ControllerThis opens up two windows, one for showing the state of the robot and another for inputting commands to the robot. The robot should have the program robot3.lx running so that the communication will work.
The sources and classes are included in the projects distribution file available at the download page.
See also the Javadoc's of the Java-classes (also available in the distribution file).
Aside from the robot3-package the distribution file also includes the class-file for the class PortTest. It is used to avoid a bug in Matlab, see the Matlab page for more details.
If you are not familiar with what legOS is, please visit http://brickos.sourceforge.net/ of http://www.noga.de/legOS/ first. As it wasn't at all trivial to find a working version of legOS for windows, i decided to dedicate one page for it as well...
Note: It will be hard to predict how long the information here will be valid, as legOS has changed it's name to brickOS, and some of the http-addresses might change due to that.
I just wanted to get a working version of legOS that I could download the operating system and own programs to the robot, and a compiler so that I could write my own programs for the robot in C. The file to search for if called winlegos.exe, which is a Rossz Vamos-Wentworth's cygwin-free legOS version. It is also possible to run the 'nix version of legOS under windows using cygwin, but the installation using WinLegOS is much easier. Check out legOS documentation to find out how to download the firmware to the 'Brick'.
Update 25.07.2003: My legOS program fails atleast with brickos-0.2.6.10, so please use legOS 0.2.4, which is the one I used.
http://legos.sourceforge.net/files/windows/djgpp/
http://legos.sourceforge.net/files/windows/cygwin/legOS-0.2.4.html
http://www.docs.uu.se/~tobiasa/RT-TF01/assignments/running_legos_at_home
You might also want to
search for "winlegos.exe" on google.
I wrote the legOS program in C and compiled it with the compiler that came with WinLegOS. Both the source code (robot2.c) and the legOS-binary (robot2.lx) are in the distribution file, under the directory legos. The program can be downloaded to the robot using the dll-tool of the legOS (assuming that you have legOS installed to the robot and the robot is on):
dll robot3.lxThe program for legOS is really simple. It just sets up the function to handle the integrity messages using
lnp_integrity_set_handler(my_integrity_handler);After this the function my_integrity_handler is called when a message is received, and it sets the motor levels and directions according to the messages received. The main method runs all the time and shows the number of messages reveived on the lcd. This number can be used to make sure that every message sent by the PC is received, as the PC's Java-interface shows the number of messages sent.
My version of Matlab is 6.1, but I think the Java-interface works similarily with other version of Matlab as well. To use the java-classes in Matlab the directory of the classes must be added to Matlab's classpath. This can be easily done from Matlab by typing
edit classpath.txtThe directory to add is the root directory of the Java classes, for example c:\matlab_robot\java\classes, not the c:\matlab_robot\java\classes\robot2-directory. More information about Matlab's Java-interface can be found from the Matlab's help.
I had a weird bug in the system that prevented the java objects used from Matlab using the serial ports. I wrote a java program that lists the available ports and realized that running the PortTest program before changing from the default working directory to the directory where I had my robot programs made the bug disappear. The PortTest program is included in the distribution file, but without sources as I managed to delete them during some testing. :) The output of PortTest when everything is fine:
>> PortTest
List of available communication ports:
COM1 type:1 isOwned:false
COM2 type:1 isOwned:false
LPT1 type:2 isOwned:false
LPT2 type:2 isOwned:false

ans =

PortTest@75d726

>>
I think the bug has something to do with the file javax.comm.properties that defines the communication ports, but I didn't find any way to fix it
The Matlab programs are documented in the code,
so comments about all of them can be found using
the Matlab command HELP FUN.
The function paramlabel is not written by me, but I couldn't find the authors name in the file, thanks to him/her anyway.
A thing that should be noticed is that for some reason
my robot had a lot of difference in the power of the
two motors. That is why in each of the motor-controlling
Matlab-functions there's defined SPEED_NORMAL_A=50; and
SPEED_NORMAL_B=150; as these were nice values with which
the robot moved straight forward. These values will
probably not work with some other motors, you should
test to see what works with your robot.
These are the main programs you propably want to try (more info available with Matlab's help):
| Program | Comment | ||||
|---|---|---|---|---|---|
robot_travel_v2 |
If the script robot_init hasn't been ran, this script initializes the robot by running it. The line is detected by counting the horisontal gradient of the image. The line is where the horisontal contrast is biggest. The perpendicular ending is detected by counting the maximum of vertical gradients of each vertical line. If the meadian of these is big enough, the robot sees the vertical line and is in the end. Any striped line should work just fine. For line following i used resolution 160x120 so that the analysis can easily be done in realtime. |
||||
follow_trolley |
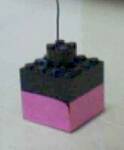
The function detect_trolley is used for (surprisingly =] ) detecting where the trolley is in the picture. It is detected based on it's colour, pink seemed a good idea since I have no other pink items in my room. Uses two PD-regulators, one for the speed of the robot and one for the angle. If the robot doesn't see the trolley it will turn left/right until it is detected in the picture. For trolley following i used resolution 160x120 so that the analysis can easily be done in realtime. |
||||
analyze_object_types |
Grabs an image and analyzes the objects in it Uses get_object_type to determine the type of each object, otherwise does the same as analyze_objects. The objects are distinguished by a double threshold; really bright pixels and pixels a bit darker than the median are considered as objects. This works fine for me, but depends ofcourse totally on the color of the floor and lighting. For object analysis i used resolution 352x280.
|
||||
r2 |
Uses robot_move_to_end_v2 to make the robot to move to the end of the line and then plots the results | ||||
robot_init |
This script initializes the robot-controller and some global variables
used to control the robot The functions robot_travel, robot_travel_v2 and follow_trolley run this script automatically if it hasn't already been ran. |
A few words about how I mounted the camera can be found from the 'Constructing the robot' -page.
As mentioned earlier, I used the camera that comes with Lego Mindstorms Vision Command. The program that came with the camera didn't want to install on my Windows 2000, but that caused no problems. The camera is actually a repacked Logitech QuickCam Web, and my Windows found the drivers automatically when I plugged in the camera to the USB port. If the drivers can't be automatically found they can be downloaded from Logitech's website.
To grab the images to Matlab i use a tool called Vision For Matlab by Farzad Pezeshkpour. The binaries needed by the Matlab programs are included in my distribution file. The source codes of VFM can be found at http://www.isr.ist.utl.pt/~alex/Resources/vfm/ .
I did manage to create a robot that can be controlled from Matlab and I did some real time image analysis programs to control the robot, and they worked quite nicely. I used a PD-regulator to make the robot follow a twisted line and I think the robot is a good tool for regulator realization as results are directly and clearly seen by anyone.
There are still some thing that should definitely have been done.
If you want to use my software to create a Matlab controlled robot, or if something else documented here interests you, you can download the distribution file ( 281 KB) of the project.
To download the operating system and the program to the RCX Brick you will also need WinLegOs.
The distribution has following directories:
| Directory | Contents |
|---|---|
\matlab_robot\matlab\ |
The Matlab files to control the robot and to use the camera |
\matlab_robot\legos\ |
The legOS sources and binaries, ie. the program that runs in the RCX Brick |
\matlab_robot\java\classes |
The Java-class-files for the Java interface that communicates with the robot |
\matlab_robot\java\sources |
The Java-sources for the Java interface that communicates with the robot |
\matlab_robot\java\javadocs |
Javadoc-documentation of the Java interface |
\matlab_robot\docs\ |
This documentation of the project as one big HTML (the printable version) |